StatCounter

Thursday, June 19, 2014

Browser "Virus" Handling


I decided to compare a few browsers to see how well they could handle a fake virus.


 This code, written in HTML and Javascript, will make infinite alert popups, saying 'Try to Quit'.

This could be very annoying, because alerts stop you from doing anything in the browser. In this case, it will never allow you to visit other pages. Trying out this code in Safari even made me to force-quit, which could make you lose a lot of unsaved/valuable info.


For those of you willing to risk it, try the html code:


<!DOCTYPE html>
<html>
<body>

<p>Click to die:</p>

<button onclick="myFunction()">Virus Attack</button>

<script>
function myFunction() {
  while(1) {//Infinite Loop!
    alert("Try to quit!");
  }
}
</script>

</body>
</html>

(copy-paste this code to a text-editor and save it as a .html file)
(press the Virus Attack button, and the popups will appear. If you have trouble, just force quit the app)

Disclaimer: I am not responsible for any damage caused by this fake virus. USE AT YOUR OWN RISK!!!!! 

Now, the error handling:

Google chrome did a good job, as it was able to detect repetitive messages, giving me the option to stop the virus:


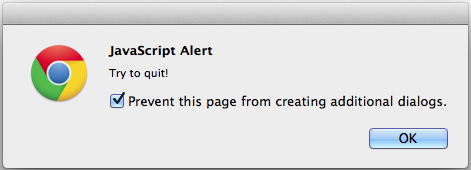
After check marking it, I recieved no more popups.


Firefox couldn't disable repetitive messages, but unlike safari(the last one), it didn't stop you from saving/closing webpages:


On Safari, it did the worst, because it couldn't cancel, while all other webpages are stopped:


So far, I would say Chrome is the best ranking in this test, then Firefox, while Safari din't do a great job handling the fake virus attack.

Wednesday, June 18, 2014

Crystal Growing

Here's another nice chemistry experiment I did recently: growing blue crystals from vinegar,peroxide,and copper. Copper is usually brownish colored, but when it is combined with any acidic substance (in this case vinegar), and  hydrogen peroxide, it converts to its blue form.

The crystal I will be showing is called Copper Acetate.

This usually happens with most the transition metals in the periodic table of elements . This includes copper, iron, cobalt, nickel, and maganese (not magnesium). These metals, originally silver colored, will create different crystal colors.


Disclaimer: Since this experiment involves heat, and  Oxygen gas is produced, it's HIGHLY recommended you do this OUTSIDE or in a fumehood.  Oxygen can help sustain fires. I am not responsible for any injury or loss to any person by doing this experiment, by mistreating the instructions, or by not moving outside or in a fumehood.


These are the materials you need (I used electrical wire for copper. You can't use modern pennies as they contain more zinc than copper) You also need a heat-resistant glass, as we'll deal with heat in this experiment.


Here's the steps:
1. Take an equal amount of peroxide and vinegar, then mix them in your beaker. Do this BEFORE you add copper!

2. Heat it up, if you want to make this experiment go faster. You can use a microwave at around 10 seconds, or if you are not willing to contaminate your microwave, you may use a torch or candle to heat. This heating is optional, but without it, you may have to wait a day for the reaction to finish.

3. Now drop in the copper, and the liquid should fizzle and turn blue. This bubbling is Oxygen gas, so it's recommended you do this outside without any flames nearby!! Oxygen can sustain fires!

4. This process is finished when there is no bubbling left. Remove the copper and wait for the cup to naturally dry.

If you want to know the chemical equation for this reaction, it's:

Cu + 2 CH3COOH + H2O2 = Cu(CH3COO)2 + 2 H2O

The bubbling is caused separately, because copper is a catalyst in decomposing hydrogen peroxide.

2H2O2  = 2H2O + O2


Here are my results:


These crystals aren't big, but I have made bigger crystals(by a method called supersaturation)

They appear black, but holding them to light makes them blue.

Friday, June 6, 2014

Here's a image processing post. I didn't use OpenCV for this, but it gives a taste of basic image processing. This code does border detection by averaging each pixel's neighbors and reflecting the differece between the neighbors and the original pixel using brightness. If there is more difference in brightness, it means there is a border, so the pixel will be brighter. Brighter pixels mean a border, while dimmer ones have less difference in color and aren't a new border.

This is how the neighboring pixels work:


 ———————---
|__A__|__B__|__C_|
|__D__|Origin |_E__|
|__F__|__G___|_H__|

brightness =  abs( neighboringPixelsAverage - origin)
                           
                                               (A+B+C+D+E+F+G+H)
neighboringPixelsAverage =   ------------------------------
                                                                8

Code: (replace "sample.png" with your image name. To add an image to your code, just drag it to the processing's window until it says "One file added to the sketch".)

//Processing code
//You may use this code for non commercial purposes, such as //research into this topic

PImage img;
float pix_up,pix_down,pix_left,pix_right;
int numOfAdjPixels,extra;

void setup() {
size(472,633);
img = loadImage("sample.png");
}

void draw() {
  loadPixels(); 
  // Since we are going to access the image's pixels too  
  img.loadPixels(); 
  for (int y = 0; y < height; y++) {
    for (int x = 0; x < width; x++) {
             // Where are we, pixel-wise?
        
        int loc = y + x*width;
        
        float now_color = get_bw(img.pixels[loc]);
        if(x > 1) {//searches for left pixel
          pix_up = get_bw(img.pixels[loc - width]);
          numOfAdjPixels++;
        } else {
          extra+=pix_up;
        }
        if(x < width-1) {//searches for right pixel
          pix_down = get_bw(img.pixels[loc+width]);
          numOfAdjPixels++;
        } else {
           extra+=pix_down;
        }
        if(y > 1) {//searches for top pixel
          pix_left = get_bw(img.pixels[loc-1]);
          numOfAdjPixels++;
        } else {
          extra+=pix_left;
        }
        if(y < height-1) {//search for bottom pixel                  
          pix_right = get_bw(img.pixels[loc+1]);
          numOfAdjPixels++;
        } else {
          extra+=pix_right;
        }
        
        float average = (pix_up + pix_down + pix_left + pix_right - extra)/numOfAdjPixels;
        extra = 0;
        numOfAdjPixels = 0;
        //stroke(r,g,b);
       pixels[loc] = color(abs(now_color - average)*mouseY/10);
    }
  }
  updatePixels();
}

float get_bw(color c) {//get black + white val from datatype color
  return (red(c) + green(c) + blue(c))/3;
}

Here's my results:

Notice how the borders of the candy is highlighted.


Here's the picture that I used:

Tuesday, June 3, 2014

How To Hack Computer Applications

Hi! It's been a long time since I've been making a post.

For this post, we will hack Safari's "Failed to open Page". I chose this because I thought the error messages were dull in color. To solve this, I tapped into Safari's internal CSS code and edited it.

We will start with the dull page:


This page is boring, as there's only white,grey,and black.

To edit the code, you will have to use Terminal. You need this to sudo into the safari application. (sudo means super-user, you must do this to tap into the system generated files)

Now double-click Terminal, and cd into the folder the document is located. 
(this command shows the computer to locate where you are)

Type in prompt: cd /Applications/Safari.app/Contents/Resources/

This will direct you to the main folder in the app. 
(Fun Fact: Apps have sub folders in them, it's not just a piece of code!)

Next, you will access the code called page-load-errors.css , as superuser(sudo), as mentioned before. I will use nano, a text editor that it is connected to Terminal.
(there are also other text editors in terminal, such as vim, emacs, you may also use these if you like)

Type in: sudo nano page-load-errors.css

This may probably ask for a user password, so you type in your login password. Then, you come to the editor. Here's the fun! 
(note each section of the code describes one particular object, such as the compass logo)

These are the highlights to the code editing:
  1.  scroll of find ".error-title.error-text" , and edit the rgba() part. (make sure to edit both error-title error-text!) The rgba() will have four parameters of color: red,green,blue,transparency. This code will fill a object a particular color. Change the first rgba() on the next line to rgba(255,0,0,0.9) and the second rgba() to rgba(0,255,0,0.9) and notice how the error text transitions from red to green.                                       
  2. Find ".suggestion-prompt.error-text, .error-message.error-text", and edit the rgba() on the next line to rgba(255,0,255,0.9). This turns the bottom "safari cant open..." into violet font.
  3. Find ".error-title" and on the next line, change the "font-size" number. This will expand or decrease the font. I chose 24px, so the font slightly increased.
This is the result form all changes: