StatCounter

Sunday, November 16, 2014

XCode iOS apps


Just made my first iOS app (other than Hello-World)
This is a reflex timer, which times how good your reflex response is.
Here's a video of it working in the ios simulator:


Friday, July 25, 2014

OpenCV Shapes Detection


In this blog post, I will show how I used Python on OpenCV to recognize shapes when displayed on a webcam.  I chose Python because it is easy to understand, but C/C++ is slightly harder and executes quicker. My code (at bottom) is pretty accurate (~85%) at detecting shapes, but it has problems recognizing some blue hues.

    You will need to install OpenCV and numpy python modules before this. There are guides on the internet available for this topic. In addition, you need Python 2, not 3 to run this. You access this by going to terminal and typing 'python' or 'python2'. Also the newest OpenCV distro doesn't work with Python- 2.7.8, so use 2.7.3 instead.

The general steps are:

1. Set up your webcam
2. Read a frame of the picture
3. Erode and Dilate the picture to remove unnecessary noise
4. Set a color range to only get shapes of a specific color (in this case I chose blue)
5. Check your picture if pixels are in that color range
6. Get the Contours (basically lines that join areas with similar colors)
7. Iterate through them and get only the biggest one
8. Approximate the biggest contours' number of sides (cv2.approxPolyDP) to find how much sides
9. Correspond this number of sides to shapes' names (quad, triangle, etc.)


The code is available here on github if you want to try it out. This code I wrote only accepts BLUE shapes, so keep that in mind while printing test-cards.

Here's a video of me trying out different shapes:


Here is me testing each shape:

Square/Quadrilateral:


Triangle:


Pentagon:

7-sided figure (Arrow):


Thursday, June 19, 2014

Browser "Virus" Handling


I decided to compare a few browsers to see how well they could handle a fake virus.


 This code, written in HTML and Javascript, will make infinite alert popups, saying 'Try to Quit'.

This could be very annoying, because alerts stop you from doing anything in the browser. In this case, it will never allow you to visit other pages. Trying out this code in Safari even made me to force-quit, which could make you lose a lot of unsaved/valuable info.


For those of you willing to risk it, try the html code:


<!DOCTYPE html>
<html>
<body>

<p>Click to die:</p>

<button onclick="myFunction()">Virus Attack</button>

<script>
function myFunction() {
  while(1) {//Infinite Loop!
    alert("Try to quit!");
  }
}
</script>

</body>
</html>

(copy-paste this code to a text-editor and save it as a .html file)
(press the Virus Attack button, and the popups will appear. If you have trouble, just force quit the app)

Disclaimer: I am not responsible for any damage caused by this fake virus. USE AT YOUR OWN RISK!!!!! 

Now, the error handling:

Google chrome did a good job, as it was able to detect repetitive messages, giving me the option to stop the virus:


After check marking it, I recieved no more popups.


Firefox couldn't disable repetitive messages, but unlike safari(the last one), it didn't stop you from saving/closing webpages:


On Safari, it did the worst, because it couldn't cancel, while all other webpages are stopped:


So far, I would say Chrome is the best ranking in this test, then Firefox, while Safari din't do a great job handling the fake virus attack.

Wednesday, June 18, 2014

Crystal Growing

Here's another nice chemistry experiment I did recently: growing blue crystals from vinegar,peroxide,and copper. Copper is usually brownish colored, but when it is combined with any acidic substance (in this case vinegar), and  hydrogen peroxide, it converts to its blue form.

The crystal I will be showing is called Copper Acetate.

This usually happens with most the transition metals in the periodic table of elements . This includes copper, iron, cobalt, nickel, and maganese (not magnesium). These metals, originally silver colored, will create different crystal colors.


Disclaimer: Since this experiment involves heat, and  Oxygen gas is produced, it's HIGHLY recommended you do this OUTSIDE or in a fumehood.  Oxygen can help sustain fires. I am not responsible for any injury or loss to any person by doing this experiment, by mistreating the instructions, or by not moving outside or in a fumehood.


These are the materials you need (I used electrical wire for copper. You can't use modern pennies as they contain more zinc than copper) You also need a heat-resistant glass, as we'll deal with heat in this experiment.


Here's the steps:
1. Take an equal amount of peroxide and vinegar, then mix them in your beaker. Do this BEFORE you add copper!

2. Heat it up, if you want to make this experiment go faster. You can use a microwave at around 10 seconds, or if you are not willing to contaminate your microwave, you may use a torch or candle to heat. This heating is optional, but without it, you may have to wait a day for the reaction to finish.

3. Now drop in the copper, and the liquid should fizzle and turn blue. This bubbling is Oxygen gas, so it's recommended you do this outside without any flames nearby!! Oxygen can sustain fires!

4. This process is finished when there is no bubbling left. Remove the copper and wait for the cup to naturally dry.

If you want to know the chemical equation for this reaction, it's:

Cu + 2 CH3COOH + H2O2 = Cu(CH3COO)2 + 2 H2O

The bubbling is caused separately, because copper is a catalyst in decomposing hydrogen peroxide.

2H2O2  = 2H2O + O2


Here are my results:


These crystals aren't big, but I have made bigger crystals(by a method called supersaturation)

They appear black, but holding them to light makes them blue.

Friday, June 6, 2014

Here's a image processing post. I didn't use OpenCV for this, but it gives a taste of basic image processing. This code does border detection by averaging each pixel's neighbors and reflecting the differece between the neighbors and the original pixel using brightness. If there is more difference in brightness, it means there is a border, so the pixel will be brighter. Brighter pixels mean a border, while dimmer ones have less difference in color and aren't a new border.

This is how the neighboring pixels work:


 ———————---
|__A__|__B__|__C_|
|__D__|Origin |_E__|
|__F__|__G___|_H__|

brightness =  abs( neighboringPixelsAverage - origin)
                           
                                               (A+B+C+D+E+F+G+H)
neighboringPixelsAverage =   ------------------------------
                                                                8

Code: (replace "sample.png" with your image name. To add an image to your code, just drag it to the processing's window until it says "One file added to the sketch".)

//Processing code
//You may use this code for non commercial purposes, such as //research into this topic

PImage img;
float pix_up,pix_down,pix_left,pix_right;
int numOfAdjPixels,extra;

void setup() {
size(472,633);
img = loadImage("sample.png");
}

void draw() {
  loadPixels(); 
  // Since we are going to access the image's pixels too  
  img.loadPixels(); 
  for (int y = 0; y < height; y++) {
    for (int x = 0; x < width; x++) {
             // Where are we, pixel-wise?
        
        int loc = y + x*width;
        
        float now_color = get_bw(img.pixels[loc]);
        if(x > 1) {//searches for left pixel
          pix_up = get_bw(img.pixels[loc - width]);
          numOfAdjPixels++;
        } else {
          extra+=pix_up;
        }
        if(x < width-1) {//searches for right pixel
          pix_down = get_bw(img.pixels[loc+width]);
          numOfAdjPixels++;
        } else {
           extra+=pix_down;
        }
        if(y > 1) {//searches for top pixel
          pix_left = get_bw(img.pixels[loc-1]);
          numOfAdjPixels++;
        } else {
          extra+=pix_left;
        }
        if(y < height-1) {//search for bottom pixel                  
          pix_right = get_bw(img.pixels[loc+1]);
          numOfAdjPixels++;
        } else {
          extra+=pix_right;
        }
        
        float average = (pix_up + pix_down + pix_left + pix_right - extra)/numOfAdjPixels;
        extra = 0;
        numOfAdjPixels = 0;
        //stroke(r,g,b);
       pixels[loc] = color(abs(now_color - average)*mouseY/10);
    }
  }
  updatePixels();
}

float get_bw(color c) {//get black + white val from datatype color
  return (red(c) + green(c) + blue(c))/3;
}

Here's my results:

Notice how the borders of the candy is highlighted.


Here's the picture that I used:

Tuesday, June 3, 2014

How To Hack Computer Applications

Hi! It's been a long time since I've been making a post.

For this post, we will hack Safari's "Failed to open Page". I chose this because I thought the error messages were dull in color. To solve this, I tapped into Safari's internal CSS code and edited it.

We will start with the dull page:


This page is boring, as there's only white,grey,and black.

To edit the code, you will have to use Terminal. You need this to sudo into the safari application. (sudo means super-user, you must do this to tap into the system generated files)

Now double-click Terminal, and cd into the folder the document is located. 
(this command shows the computer to locate where you are)

Type in prompt: cd /Applications/Safari.app/Contents/Resources/

This will direct you to the main folder in the app. 
(Fun Fact: Apps have sub folders in them, it's not just a piece of code!)

Next, you will access the code called page-load-errors.css , as superuser(sudo), as mentioned before. I will use nano, a text editor that it is connected to Terminal.
(there are also other text editors in terminal, such as vim, emacs, you may also use these if you like)

Type in: sudo nano page-load-errors.css

This may probably ask for a user password, so you type in your login password. Then, you come to the editor. Here's the fun! 
(note each section of the code describes one particular object, such as the compass logo)

These are the highlights to the code editing:
  1.  scroll of find ".error-title.error-text" , and edit the rgba() part. (make sure to edit both error-title error-text!) The rgba() will have four parameters of color: red,green,blue,transparency. This code will fill a object a particular color. Change the first rgba() on the next line to rgba(255,0,0,0.9) and the second rgba() to rgba(0,255,0,0.9) and notice how the error text transitions from red to green.                                       
  2. Find ".suggestion-prompt.error-text, .error-message.error-text", and edit the rgba() on the next line to rgba(255,0,255,0.9). This turns the bottom "safari cant open..." into violet font.
  3. Find ".error-title" and on the next line, change the "font-size" number. This will expand or decrease the font. I chose 24px, so the font slightly increased.
This is the result form all changes:


Saturday, May 3, 2014

Here's another beautiful program on Processing(processing.org) I made: a colorful mountain complex. To create the "mountain"-effect, I use the noise() function, which also creates a random curve to the mountains. However, unlike random(), it creates a smooth increment/decrement on numbers called Perlin noise instead of random numbers jumping up and down. 

This is the code:


float b = 0;
float c = 0;
 size(1000,200);//This sets the window's length and width


for(int i = 0; i < random(80,300); i++) {
  stroke(random(255),random(255),random(255),random(70,100));
  strokeWeight(2);
   for(int count = 0; count < width; count++) {
      b = noise(c) * 200;
      c = c + 0.01;
      line(count,200,count,b);
   }
   
}

Here are my results:


For more info on Perlin noise and noise() :

http://processing.org/reference/noise_.html
http://en.wikipedia.org/wiki/Perlin_noise

Saturday, April 12, 2014

I  thought I wanted to share with you a really nice piece of code I recently created in Processing (processing.org) that makes a very beautiful drawing. If you don't know what this is, refer to my older post. It isn't hard to program, and only has a few lines of code.

Here's the code:

float random1x,random1y,random2x,random2y,random3x,random3y;
int shapes = 100; 

  size(400,400);
  noStroke();
  for(int i = 0; i < shapes; i++) {
    random1x = random(0,width);
    random1y = random(0,height);
    random2x = random(0,width);
    random2y = random(0,height);
    random3x = random(0,width);
    random3y = random(0,height);
    fill(random(255),random(255),random(255),random(255));
    triangle(random1x,random1y,random2x,random2y,random3x,random3y);
  }


 Here's my results after three different tries:


The code works like this: First, the  variables randomx1,randomy1, randomy2...... define my random x,y values for the triangle coordinates. The next line, shapes = 100,shows how many shapes to draw. We are drawing 100 triangles in this example. The size(x,y) adjusts the screen to x pixels wide, y pixels long, which in my case is 400 pixels wide, 400 pixels long. The noStroke() sets the triangles to not have an annoying black border.  Next, we encounter a for loop, which iterates the variable i over the number of shapes (shapes) we'll draw. Then comes the random() statement,  which makes a random number in the range of two numbers set in the parentheses. I set the minimum to 1, and I set x,y max is respectively set to width, height, because the width is on x axis, and the height is on the y axis. The fill(r,g,b,alpha) takes an 8-bit red, green, blue, and an alpha value. The alpha value is the amount of transparency of an object. In case you're wondering, if the random() function takes one input, as in random(255), the assigned number(255) is the maximum, and it assumes that the minimum is 0. It then assigns a random 8-bit color (0-255) for r,g,b, and alpha, to the fill() statement for the triangles. The last statement, triangle(),  assigns the three random x and y's we created to make a triangle. After doing this i  number of times, we reach the end of code, and the pictures remain still.

Thursday, April 10, 2014

     In this post, I will show you the basics of Processing(www.processing.org), the free and open source Java/C++-based coding graphics environment. For those of you familiarized with Arduino, the robotics microcontroller, its coding environment is inspired by Processing, so it will be easy to use! This software allows you to use straighforward syntax from simple circle shapes to complex 3D OpenGL commands.
   
The thing I  particularly like abut this is the easy installation of a library called OpenCV, a camera-based image processing library that allows face detection and hand tracking, combined with the easy syntax of Processing. OpenCV is good for robots as it could track colors precisely and easily interact with the human. I will describe this in a futute post.

First, I will get you familiarized with the coding enviroment.

To get started, download it from www.processing.org.
The app will appear in downloads, so drag it to the Applications folder.

After launching, this is what the software should look like:


Now try some code, and copy-paste this in the console:


ellipse(50,50,80,80); //Circle at x,50 y,50 l,80 w,80
//Everything in this font is code!!!


Syntax:
ellipse(x(pixels)coordinate, y(pixels)coordinate, length, width);

This draws a circle, 50 pixels x-coordinate(1st number), 50 pixels y-coordinate(2nd number), 80 pixels length(3rd number), 80 pixels width(4th number).  The doubleslash "//" is a comment, and this allows you to put non-exactable words to remind you what this piece or line of code does.

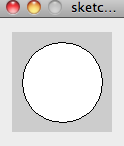
Download the software at processing.org, copy/paste the following, and run it with the "play" symbol. After ~10 seconds, a window pops up, with a white circle that has poor image quality.


To smoothen the rugged circle, just add the command smooth().
Try this:

smooth(); //Smoothen circle
ellipse(50,50,80,80);

This draws a much smoother circle! 


If you want to smooth only one object, and the other one non-smooth, use noSmooth() :
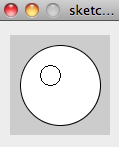
smooth();
ellipse(50,50,80,80);
noSmooth();
ellipse(40,40,20,20);


Filling a object is easy: fill();

Syntax: 
fill(red value, green value, blue value);
or fill(brightness); (for black and white)

fill(255,255,0);//rgb mode
ellipse(50,50,80,80);


The fill() takes a value only from 0-255. 0 is the darkest for each color value/black (r,g,b) and 255 is white. You combine these primary colors to create secondary colors of the rainbow/visible color spectrum. Play with these values to create rainbow colors!


I won't cover everything about Processing in this post, because you can find tutorials at http://processing.org/tutorials/. My objective here is to make you familiarized for future codes I post for graphics and animations and cool sketches, and some OpenCV stuff in processing.


Thursday, April 3, 2014

In robotics, making a precisely straight robot or a precise 90/180 degree turn right/left can be challenging, especially if you are using trial-and-error to figure out how long to turn the robot. There are some methods to do improve accuracy:


Trial and Error, without sensors
Gyroscope Sensor
Odometry/Wheel Encoder Sensor
Simplicity
Easy, just play with
delay values
Medium-Hard, may require
knowledge of  i2c/spi
protocols and/or reading the sensor datasheet, expensive ~$20-40
Medium, may require basic geometry in measuring angles, coding is straightforward. ~$5-20
Accuracy
Unaccurate,
speed changes
 when voltage drops
Accurate, relies on the inertia of a spinning
disk called a gyro
to measure the angular velocity.
During drift, it finds the angular displacement and auto-corrects to
 the original angle.
Accurate on 90 degree/180 degree turns with right wheel diameter/chassis diameter calculations, but can't be used in moving
forward because of drift.
Pros
Easy-to-code
Accurate on both straight and degree turn robots
Moderately inexpensive, accurate degree turn 
with correct geometry,
straightforward coding.
Cons
Requires a lot of adjustment
when the  voltage
 drops to match speed
Requires some intermediate coding skills, and is costly.
Doesn't sense drift!


Each has its own advantages, but I will use the gyroscope method in my future robot posts, because it is accurate in both going forward as well as 90 degree turns. Unlike odometry, which only senses the turns the motor traveled for each wheel, I could compensate for the angular drift when moving straight, because the gyro knows the difference between now's angle and the angle we started with.

Monday, March 31, 2014


   As  my first chemistry post, I will show you how to make a very interesting iron chemical - the Ferrate ion ([FeO4]2-). It contains 4 oxygen and 1 iron ion. Why is this special? Well, it's iron in the +6 oxidation state(this is number of bonds this chemical has). Regular every day iron rust is +3 oxidation state, so 3 extra bonds is alot! 
   What makes this special to me is it's pink-purple color. You never see iron compounds look pink, they are all the dirty-orange chemical. For those of you interested in its chemical structure, here's it:(iron = Fe, oxygen = O, the minus ions hook up to a alkali metal.)
       
Now I will show you how to make your own, Sodium ferrate. Now first, I have to warn you that SAFETY IS FIRST!!!! Strong bases such as drain cleaner are used in this experiment, and they HURT. Wear proper gloves and/or face shield clothes during this experiment. I DO NOT take responsibility if you get injured by carelessly handling drain cleaner. 
    Sodium ferrate is basically two sodium ions carrying a positive charge hooked up to each of the negatives on the ferrate ion. You will need the follwing items to make this compound:
  • A strong base to keep the complex stable, such as beaded drain cleaner, NOT liquid(Sodium Hydroxide) 
  • A water-soluble iron compound such as iron (3+) chloride (pcb etchant) to oxidize
  • A oxidizer, such as bleach(sodium hypochlorite)
Here are the steps:
  1.  React the sodium hydroxide(or your strong base) with your iron (3+) compound. Dissolve as much drain cleaner as you can in the iron(3+) compound, as you need more towards the upcomming reaction. This should form a brown-ish gel-like precipitate. This is the brown stuff that accumulated in the bottom of my test tube photo. What has happened: the Fe3+ gets  3 hydroxide (OH-) ions, combining to form Fe(OH)3. This is not soluble in water, so it comes out as a gel. (FeCl3 + 3NaOH = Fe(OH)3 + NaCl)
  2.  Pour some bleach on the precipitate. This will oxidize the Fe3+ to Fe6+. For maximum yield, heat up the mixture, preferrably on a Bunsen burner. Fun Fact: Bleach is basically table salt plus an extra oxygen molecule! What has happened: Since bleach has a extra oxygen molecule than salt, we can make use of it in this reaction to oxidize Iron 3+ to Iron 6+. The extra sodium ions in sodium hydroxide(drain cleaner) supply the alkali metal ions to hook up to the [FeO4]2- complex. (Fe(OH)
    3 + 3 NaOCl + 4 NaOH → 2 Na2[FeO
    4
    ]
     + 5 H
    2
    O
     + 3 NaCl
  3.  Wait about a day to settle the chemicals. A successful reaction creates a bright pink to light purple  liquid like mine's on the first pict. If your liquid is colorless, you may want to add more base(drain cleaner) to the reaction  vessel until you cannot dissolve it anymore.
Unfortunately, this complex is unstable and may die out in a couple days. To stablize this compound, add barium ions to this complex, preferrably barium chloride. Since many barium compounds are insoluble in water, this forces the complex out of water and turns it into the solid barium ferrate. As long it isn't in strong acid, this compound will be stable.

Thursday, March 27, 2014

Why choose Arduino?

  • Arduino is cheap: only $30. Other controllers like NXT are well over ~$200
  • Arduino is free software: unlike other microprocessors, you have to buy the chip to get a copy of the software
  • Arduino is cross platform, you can use it on all Windows, Mac and Linux. Others like Basic Stamp only work on Windows.
  • Arduino's code is straightforward: just digitalWrite(pin, value) to control a digital pin, no complex bit-shifting and bitwise programming required
  • Arduino is new tech: Arduino Uno released in 2011
Welcome to Patrick Yu's blog!

   I am a middle school programmer and chemist. This blog will be dedicated to computer programming/coding, arduino, and robotic stuff. I also have an intrest in chemistry, so there will also be updates about chemistry.