StatCounter

Saturday, April 12, 2014

I  thought I wanted to share with you a really nice piece of code I recently created in Processing (processing.org) that makes a very beautiful drawing. If you don't know what this is, refer to my older post. It isn't hard to program, and only has a few lines of code.

Here's the code:

float random1x,random1y,random2x,random2y,random3x,random3y;
int shapes = 100; 

  size(400,400);
  noStroke();
  for(int i = 0; i < shapes; i++) {
    random1x = random(0,width);
    random1y = random(0,height);
    random2x = random(0,width);
    random2y = random(0,height);
    random3x = random(0,width);
    random3y = random(0,height);
    fill(random(255),random(255),random(255),random(255));
    triangle(random1x,random1y,random2x,random2y,random3x,random3y);
  }


 Here's my results after three different tries:


The code works like this: First, the  variables randomx1,randomy1, randomy2...... define my random x,y values for the triangle coordinates. The next line, shapes = 100,shows how many shapes to draw. We are drawing 100 triangles in this example. The size(x,y) adjusts the screen to x pixels wide, y pixels long, which in my case is 400 pixels wide, 400 pixels long. The noStroke() sets the triangles to not have an annoying black border.  Next, we encounter a for loop, which iterates the variable i over the number of shapes (shapes) we'll draw. Then comes the random() statement,  which makes a random number in the range of two numbers set in the parentheses. I set the minimum to 1, and I set x,y max is respectively set to width, height, because the width is on x axis, and the height is on the y axis. The fill(r,g,b,alpha) takes an 8-bit red, green, blue, and an alpha value. The alpha value is the amount of transparency of an object. In case you're wondering, if the random() function takes one input, as in random(255), the assigned number(255) is the maximum, and it assumes that the minimum is 0. It then assigns a random 8-bit color (0-255) for r,g,b, and alpha, to the fill() statement for the triangles. The last statement, triangle(),  assigns the three random x and y's we created to make a triangle. After doing this i  number of times, we reach the end of code, and the pictures remain still.

Thursday, April 10, 2014

     In this post, I will show you the basics of Processing(www.processing.org), the free and open source Java/C++-based coding graphics environment. For those of you familiarized with Arduino, the robotics microcontroller, its coding environment is inspired by Processing, so it will be easy to use! This software allows you to use straighforward syntax from simple circle shapes to complex 3D OpenGL commands.
   
The thing I  particularly like abut this is the easy installation of a library called OpenCV, a camera-based image processing library that allows face detection and hand tracking, combined with the easy syntax of Processing. OpenCV is good for robots as it could track colors precisely and easily interact with the human. I will describe this in a futute post.

First, I will get you familiarized with the coding enviroment.

To get started, download it from www.processing.org.
The app will appear in downloads, so drag it to the Applications folder.

After launching, this is what the software should look like:


Now try some code, and copy-paste this in the console:


ellipse(50,50,80,80); //Circle at x,50 y,50 l,80 w,80
//Everything in this font is code!!!


Syntax:
ellipse(x(pixels)coordinate, y(pixels)coordinate, length, width);

This draws a circle, 50 pixels x-coordinate(1st number), 50 pixels y-coordinate(2nd number), 80 pixels length(3rd number), 80 pixels width(4th number).  The doubleslash "//" is a comment, and this allows you to put non-exactable words to remind you what this piece or line of code does.

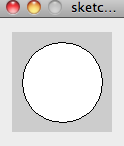
Download the software at processing.org, copy/paste the following, and run it with the "play" symbol. After ~10 seconds, a window pops up, with a white circle that has poor image quality.


To smoothen the rugged circle, just add the command smooth().
Try this:

smooth(); //Smoothen circle
ellipse(50,50,80,80);

This draws a much smoother circle! 


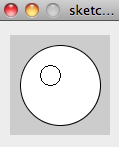
If you want to smooth only one object, and the other one non-smooth, use noSmooth() :
smooth();
ellipse(50,50,80,80);
noSmooth();
ellipse(40,40,20,20);


Filling a object is easy: fill();

Syntax: 
fill(red value, green value, blue value);
or fill(brightness); (for black and white)

fill(255,255,0);//rgb mode
ellipse(50,50,80,80);


The fill() takes a value only from 0-255. 0 is the darkest for each color value/black (r,g,b) and 255 is white. You combine these primary colors to create secondary colors of the rainbow/visible color spectrum. Play with these values to create rainbow colors!


I won't cover everything about Processing in this post, because you can find tutorials at http://processing.org/tutorials/. My objective here is to make you familiarized for future codes I post for graphics and animations and cool sketches, and some OpenCV stuff in processing.


Thursday, April 3, 2014

In robotics, making a precisely straight robot or a precise 90/180 degree turn right/left can be challenging, especially if you are using trial-and-error to figure out how long to turn the robot. There are some methods to do improve accuracy:


Trial and Error, without sensors
Gyroscope Sensor
Odometry/Wheel Encoder Sensor
Simplicity
Easy, just play with
delay values
Medium-Hard, may require
knowledge of  i2c/spi
protocols and/or reading the sensor datasheet, expensive ~$20-40
Medium, may require basic geometry in measuring angles, coding is straightforward. ~$5-20
Accuracy
Unaccurate,
speed changes
 when voltage drops
Accurate, relies on the inertia of a spinning
disk called a gyro
to measure the angular velocity.
During drift, it finds the angular displacement and auto-corrects to
 the original angle.
Accurate on 90 degree/180 degree turns with right wheel diameter/chassis diameter calculations, but can't be used in moving
forward because of drift.
Pros
Easy-to-code
Accurate on both straight and degree turn robots
Moderately inexpensive, accurate degree turn 
with correct geometry,
straightforward coding.
Cons
Requires a lot of adjustment
when the  voltage
 drops to match speed
Requires some intermediate coding skills, and is costly.
Doesn't sense drift!


Each has its own advantages, but I will use the gyroscope method in my future robot posts, because it is accurate in both going forward as well as 90 degree turns. Unlike odometry, which only senses the turns the motor traveled for each wheel, I could compensate for the angular drift when moving straight, because the gyro knows the difference between now's angle and the angle we started with.